Pages

Showing posts with label recipe. Show all posts

November 1, 2017

Christmas Jam & A Lesson Learned

It's that time of year... I've only been waiting only since mid-end of winter, 
when I couldn't find any fresh cranberries in the grocery store anymore!!!

I was shopping last week and I SAW THEM!! 
They were beautiful! 
I could NOT resist and I bought 5 bags of fresh cranberries!! 
(Then of course, I HAD to buy 4 pounds of fresh strawberries and 5 giant oranges!)


I made Christmas jam for the first time just before Christmas last year and saved only 
2 small jars for our consumption! 
That was a mistake... for it is truly delicious, and I had no clue that fresh cranberries 
were only available seasonally! 
I set out yesterday to make 5 batches of my new favorite!


I bought 4 dozen jars to use as gifts ... 
the store only had 2 dozen of my 'tried and true' beloved, Ball jars... 
so I opted to get 2 dozen of a different 'off' brand. 
They were pretty enough and would make for great gifts!

It's a good thing that I water bath my jams... because 
I couldn't really tell if the seals took or not before!


 In case you are wondering about the recipe.... here it is! 
SUPER EASY, SUPER DELICIOUS 
and a 
SUPER CHRISTMAS GIFT! 


 My lesson learned...  stick with Ball Jars!! 

August 3, 2016

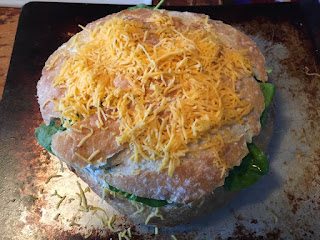
Bread Bowl Pizza

There was a short video that made its way around Face Book a little while ago.... 
it showed how to make a pizza like dinner using a round loaf of bread!
I have tried it TWICE actually and plan to again! 
It was DELICIOUS and easy to make!!


I used a hard, artisan bread ... 
Cut the top off and scoop out the bread from the bottom part.
It will look like an empty bread bowl!


 Now for the fun part!! 
Add what would be the toppings... but in this case
it's the filling!! I used spaghetti sauce, a mozzarella block of cheese
cut into slices, chunks of ham, peppers, fresh basil and fresh spinach!


Layer the toppings and sauce ending with the 
mozzarella cheese and put the top on!!
At this point, the original recipe called for wrapping it in
tin foil and putting something weighty on top for about 
half an hour, but I skipped this part!! Top the bread with
a grated cheddar blend (or whatever kind you like).


Bake in an oven preheated to 350* 
for about 30 minutes!!


Cool just a bit and cut it up for serving!!
I found cutting was the most difficult part, HOT and messy
but well worth it! It is sooo yummy!!

My second time making it I sauteed up some 
home made sweet sausage, vidalia onions and sweet yellow
peppers. I used the traditional spaghetti sauce and sliced mozzarella
cheese along with some sliced black olives!! That combination 
was very good too!! 

My NEXT time making this I will use an Alfredo sauce with the mozzarella
cheese and sautee' up some bacon, boneless chicken, vidalia onions and 
broccoli!! I can't wait to try this!! It is a great combo for regular pizza, so 
I'm thinking it will be fantastic in this pizza bowl too!!

That's all for tonight.... 
Hope you are enjoying whatever you
are doing! God bless you!


November 15, 2012

Sausage - Sweet Potato Bake

I tried a new recipe tonight! I was looking through some of the postings on the Simple Lives Thursday and saw this one....  I was intrigued as the post writer said she found it in one of the cookbooks that I have right here on my bookshelf! Kinda funny how we all see different things when when we are looking at the very same thing!!


Well, I made the casserole and it was pretty good!! Naturally, there are things I'd change next time... like, I'd probably cook up 1/4-1/2 of a sliced Vidalia onion in with the sausage, and I'd cut down the added sugar even more then I already did!! :)


Actually, I would only add a sprinkle of cinnamon sugar to the top... and nothing more! The flavor was quite good and everyone said they liked it! Pete suggested using a more sour apple, it would help to balance the naturally sweet flavors. I may have to do that next time too!

September 15, 2012

Tomatoes

I wanted to try something different this year with the tomatoes! I started out making spaghetti sauce, but looking at the quantity that I'd have to can it was not all that much... maybe one quart and one pint. So after thinking about what to do, I decided to turn it into pizza sauce. I froze it in quantities for ONE pizza each! So many times now there are just two of us at home for dinner on the weekends, so why open a full quart or pint of sauce? I froze 10 containers approx 1 1/4 cups each! (We made pizza that night.... it was pretty good and quantity was perfect!)


Our next adventure was when Audrey wanted to dehydrate some tomatoes! She cut them up and lightly salted them then put them on the racks...  (since I've tried this before, I knew to suggest that she spray the racks with an oil to keep the dried tomatoes from sticking!) She set the heat to 140* and let them go!! She also sprinkled them with some basil for yummy flavoring!! This took maybe 8 hours since some of the pieces were of good size! After it was all said and done...  they fit in a small freezer container! Yikes.... hard to imagine three racks of tomato pieces all fit in here... but they did!! And, I added some oil to it for storage.... not needed, but an experiment on our part! We'll use these in our favorite pesto chicken recipe! YUMMY!


Then on to making tomato soup!! I've never attempted anything but store bought canned tomato soup for some reason. I searched for a good recipe online and found one called "Mom's Best Tomato Soup Canning Recipe". I can't go wrong with that kind of a name, right?!

After reading some of the comments (a few times) I started....  Of course, if you know me at all, you know I almost NEVER make a recipe exactly as it is written. And, you won't be disappointed to know, the same holds true for this one! The recipe called for 6 onions, chopped... well, onions aren't always a favorite around here, so I opted for 1 VERY big Vidalia onion and instead of a whole bunch of celery, I cut up about 3/4 of a bunch! (Keep in mind... the goal is for flavor and a bunch depending on where you live will vary in size. And as for the onions, I think the author must use regular yellow onions which would be way to strong for my family.) I cooked this all down in a little bit of oil and then added the tomatoes and they cooked over low heat for a while! I used my immersion blender since I really didn't want to lose the onions and celery  only the skins & seeds of the tomatoes. I added a few more cut up tomatoes, allowed it to simmer and then used my Foley food mill to rid the pot of seeds & skins!! It worked like a charm!!


Here's where the next change comes...  I used 3/4 cup of sugar instead of a full cup and I did NOT add the flour/butter (rue) to thicken the soup. Instead, I decided to wait as some of the comments suggested, for when I actually heat the soup up to eat! A few of the comments were similar in saying:

"If you're following current USDA/NCHFP (US National Center for Home Food Preservation) recommendations for shelf-stable food storage safety (updated in 2009), they no longer recommend canning things with flour as a thickener. Likewise, butter and dairy products."

The remedy is to use a pressure canner for 30 minutes at 10 pounds for pints... that would have worked fine for me too, but being in a time crunch, I opted to use the water bath method and thicken later! 14 pints of tomato soup all ready for the shelf! I can't wait to try it! Next year...  I just may try it with the thickener in!

Next up, diced and canned tomatoes... 10 pints! They're awesome to add to soups, chili and to beef up the spaghetti sauce!! The tomatoes are still turning red out in the garden! I'll probably do up some more of the diced tomatoes when there are enough ripened.
 
Go look for other awesome ideas!


August 23, 2012

Dehydrating Pan Drippings

Here's a new one for you...
(Or rather, it's a new idea to me!)
 
Pan drippings and what to do with them!
 
After the pot roast was finished cooking
and I used as much of the dripping as I needed
for making gravy, I continued cooking
down the extra juices/dripping in my crockpot.
(I left an air vent when putting the cover on)
 

After refridgerating, I scooped off the
fat and those left behind carrots.
It is LOTS easier to 
remove at this point... 


 and then I poured
it onto the solid plastic 'fruit roll sheet'.
This has a lip so nothing will spill out and
nothing will leak through!
 
 
 Here's the chicken broth left over from
roasting a chicken ...  I did not cook
this down. I put it into the fridge so that
I could remove the fat easily.
 
 
One minute in the microwave and
then poured out onto another
solid sheet for the dehydrator!
 
(I did them differently to see which
way works the best for me!)
 
It's suppose to take about 6 hours...
but, I'll let you know!
 
STORAGE:
This is suppose to look kinda like
jerky when it is done. After it's dry,
it will be cut up into roughly, 1 1/2 X 2 inch
strips and stored in Mason jars in the freezer.
 
USE:
These pieces become like bouillon
cubes only better!! NO SODIUM or
CHEMICALS!! Add a piece to
soup for wonderful flavoring or
add to a bit of boiling water
and thicken for gravy!!
 
UPDATE:
I re-hydrated the chicken pieces
to use in gravy...  very tasty!
One thing I would do differently
is to make sure that the pieces
are totally dried! Mine weren't
dried to the point of crispness... I think
there was still some fat in the drippings
so it didn't dry as well as it should.
Maybe I didn't have the temp. high
enough, maybe I just didn't wait long
enough. I will try this again!
 
 
This post is shared on
Please go check out all
the awesome ideas!

July 20, 2012

Salt... the Cookie Reality Check!


I've been looking at the things I buy
for sodium content...

It never dawned on me to look at
the salt container to read how much
sodium is in each serving!

1/4 tsp of iodized salt has 590mg of sodium!

My chocolate chip cookie recipe calls
for 1 tsp. of salt which means I'm
adding 2360mg of sodium!!


AND... THAT'S NOT ALL!!

Have you ever checked out baking soda??

I've been baking since I was
about 10 years old.... 
and I've NEVER read the
nutrition facts of baking soda!

Serving size is 1/8 tsp and
the sodium content is 150mg.

Again, that same cookie recipe
calls for 1 tsp. which means I'm
adding another 1200mg of sodium!


YIKES!!!!
SO... for a recipe that makes maybe
36 cookies that is 3560mg of SODIUM!!

You do the math....  3560/36
means each cookie has
98.88888 (or 99mg) of
sodium per cookie!

(AND, that's only if there are NO other
ingredients with sodium in them!)

AND SERIOUSLY...
WHO EATS JUST ONE?!

Maybe I'm over reacting, but
that seems like a lot to me!

January 30, 2012

Roasted Butternut Squash Lasagna

3 lbs. butternut squash, halved & seeded
3 TBsp. olive oil

Preheat oven to 450*F Grease a baking sheet and put
the squash on it to bake... brush with the oil.
Bake 45-50 minutes, until the
squash can be easily pierced with a fork.
Set aside to cool.

 Cook up 9 lasagna noodles!


1 sweet red pepper, cut up
1/2 cup Vidalia onion, cut up
1 tsp. minced garlic

Saute in olive oil then set aside.

1/4 cup butter 
1/3 cup flour
1 quart milk

Melt butter in a large sauce pan. Add flour and mix quickly.
Add the milk slowly and whisk until it thickens.
After it thickens stir in the cooked pepper/onion/garlic.
Add a little salt & black pepper to taste.

Scoop the squash out of the peel, mash
it up in a bowl then add it to the thickened
milk, pepper, onion.
(ooops, I forgot to take a picture!)
 (fresh spinach & 1 1/3 cup Parmesan cheese)


Reduce heat in the oven to 375* F Grease a
9X13 baking dish. Pour 1 Cup of the butternut
squash sauce into the baking dish and place
3 lasagna noodles on top. (You can use either the
No-Cook noodles or the pre-cook ones)

Spread 1/2 of the remaining squash sauce,
top with freshspinach (optional) and
1/2 cup Parmesan cheese.
Place another 3 noodles on top, spread the remaining
squash sauce, more spinach (optional) and 1/2 cup of
Parmesan cheese.
Top with the last 3 noodles and pour
1 cup of non-fat Half & Half (or heavy cream) over the
top of the noodles and then top that with 1/3 cup of
Parmesan cheese!  Cover with aluminum foil.


BAKE in the preheated oven 375*
for 30 minutes then
remove the foil and bake another 15-30 minutes
until the top is bubbly golden brown.

Allow to rest 5-10 minutes
before serving!  ENJOY!

November 9, 2011

Apples....

Just when you think you're finished....  someone you love brings home a bushel of apples! No, I'm not complaining. I made applesauce, we ate lots of them fresh, I've made apple pizza, apple bread, apple cake...  and now, I'm trying something new to me!

Freezing Apple Pie Filling

24 cups sliced, peeled baking apples (6-7lbs.)
3 TBsp. lemon juice
4 1/2 Cups sugar (I use half brown, half white)
1 Cup Cornstarch
2 tsp. Cinnamon
1 tsp. Salt
1/2 tsp. Nutmeg
10 Cups water

In a large bowl, toss apples with lemon juice and set aside. In a large kettle, over medium heat, combine sugar, cornstarch, cinnamon, salt & nutmeg. Add water and bring to a boil. Boil for 2 minutes, stirring constantly.

Add apples, return to a boil. Reduce heat and simmer until apples are tender, about 6 - 7 minutes. Cool for 30 minutes. Ladle into freezer containers or freezer bags, 1 quart per container, and cool to room temperature before freezing! This is enough to make about five 9 inch pies!

After thawing, put it in a pie crust, dot with butter and seal with a top crust! I'm hoping it will be as yummy as it was smelling!

I made one and a half times the recipe, that's why there's more then 5 bags ready for the freezer!

October 21, 2011

Roots & Squash Soup

Here's an interesting soup I made for dinner tonight! 
After reading the recipe from "Stuff I Feed Brian"
and having been wanting to use butternut squash as a base
 for soup, I'm trying this recipe!! I used the recipe almost as
written... but made a few adjustments for our family's
 taste. It is a soup that will be making its
way into the regular rotation here!!

ROOTS & SQUASH SOUP

1 small to medium butternut squash (or winter squash of your choice)
2 medium to large sweet potatoes
3 medium to large beets
Dash of salt

Peel & boil these veggies with just enough water to cover them.

Sweet red pepper - diced
1/4 vidalia onion - diced
1/2 tsp. minced garlic

Continue to boil until the veggies are soft.

Using a slotted spoon, remove about 3/4 of the veggies and put them
into a bowl. Use a potato masher to mash them up and then
add back to the remaining veggies still in the water/juices.
Stir in well. (You could also put the veggies into a blender
or food processor to mash or use an immersion blender!)


Add a hand full of cut up kale and/or beet greens and
cook on low for a few minutes,  just until the greens are wilted.


Serve warm with optional toppings of
sour cream, grated cheese, parm. cheese or plain yogurt
and salt & pepper to your own taste!
 (Warm cornbread is yummy with it too!) 


Be prepared for a DELICIOUS SOUP!
Your taste buds will be very excited
with the combination of  flavors!!
(Next time, I think I'm going to add
some back beans to it! Maybe make
it ahead and keep it warm in the crock pot!)

OH, THE IDEAS ARE ENDLESS!


October 10, 2011

Have You Ever Tried Mincemeat?

I've heard of mincemeat.
 I've said no thank to mincemeat.
I've looked at recipes
for making things with mincemeat.
And then, I've put those recipes away!

And now, finally...
I trying my hand at MAKING mincemeat!
(I will admit, it is at my husband's request!)

OK, it is on the stove top.....
I just tasted it for the FIRST TIME EVER.

I have to admit, it wasn't bad!

Pete's 89 year old aunt shared this recipe
with me ... so I had to try it!

Green Tomato Mincemeat
2 Quarts ground green tomatoes
2 Quarts ground apples (firm apples)
4 Cups brown sugar
1 1/2 Cups vinegar
3 Cups raisins
3 tsp. cinnamon
1 tsp. ground cloves
3/4 tsp. allspice
3/4 tsp. pepper (I used 1/2 tsp.white pepper)
2 tsp. salt
3/4 tsp. mace (I used nutmeg instead)
3/4 Cups butter
Chop apples & tomatoes and drain.
Add this and the remaining ingredients
except the butter in a stock pot and
bring to a boil. Simmer for 3 hours.
Add the butter and stir in until melted.
OK, here is what I did. I read a few
other recipes, including the one in the
Ball Blue Book. In the Ball book, it
said to combine all the ingredients and
simmer for 15 minutes then ladle into
hot jars and PRESSURE CAN both
quarts & pints for 90 minutes!

So, I compromised... I used Pete's aunt's recipe
with the exception of mace. I didn't have any.
When I looked it up to see just what it was,
I discovered it was kinda like a peppery nutmeg,
so I used nutmeg instead!

Also, since I wasn't
sure about NOT at least water bathing the
jars, I decided to follow the Ball Book
instructions to be on the safe side and
used the pressure canner!

This recipe made
3 quarts and 3 pints
AND 3/4 cup that I held out!

NOW... to try this stuff in a recipe!

SOFT MINCEMEAT COOKIES
1/4 Cup softened butter
3/4 Cup brown sugar
2 eggs
3/4 Cup mincemeat
1 1/2 Cups flour
1 1/2 tsp. baking soda
1/2 tsp. ground cinnamon
1/4 tsp. ground nutmeg
1/4 tsp. salt
1 Cup Choc. chips
1/2 Cup chopped walnuts (optional)

In a mixing bowl, cream the butter &
brown sugar. Add the eggs & mincemeat
and mix well. Add the dry ingredients and
mix well before adding the chocolate chips
and walnuts. Bake on GREASED cookie
sheets at 350* for 10-12 minutes or
until golden brown. Cool on wire racks.
Yield: about 4 dozen.


I shared this on Healthy 2Day Wednesdays and
Simple Lives Thursday!
Go check out the other wonderful posts!

October 3, 2011

Sun Dried Tomatoes ... Who Knew?

Who knew it was this easy?!
We LOVE sun dried tomatoes!
(Ok, technically... dehydrator dried!)

It is nearing the end of the garden season and 
I am TIRED of canning tomatoes.
I never thought I'd say that...  but I am.
I think it is mostly because the more I can, the more space
I need to come up with to store it!
(But that's a discussion for another day.)

I decided to give the dehydrator a try. Check this out!
Saturday night was my test run was with 2 apples and
one tray full of fresh picked cherry tomatoes ...
washed & cut in half!

I sprinkled the tomatoes with a little bit of sea salt
(didn't do that for the following batch)
and I lightly sprinkled the apples with cinnamon sugar!
Can you say DELICIOUS!!! I AM SOOO ExCiTeD!
Sunday night I loaded up the trays with more cherry tomatoes
and left them overnight (roughly from 9PM to 5AM)
and they came out perfectly!

Storage for these little guys is a mason jars
with olive oil and in the back of the fridge!
There is a total of 7 dehydrator trays in these 2 jars.
It doesn't look like much... but it is!
You ask, 'now what?'... 
I can't wait to use them in pesto-chicken,
turkey sandwiches and can't you just smell
the bread cooking!?
Ahhh, I'm going to start drooling if I don't stop now!
I'll share pictures with you as
I figure out more recipes to use them in!

The apples came out awesome too!
I only did two apples... but everyone like them!
I'll definitely be doing more of these as well,
but, most likely without the sugar!
I need to do some more investigating,
but I've seen both tomatoes
& apples stored in zipper type bags (remove air)
and store on a pantry shelf or in the freezer.
 I'll let you know how that all works out!

Next up.... regular sized tomatoes. I'm going to try thinly slicing them and then adding a little basil & sea salt before dehydrating them!

(Posted on Healthy 2day Wednesdays )

September 16, 2011

A Crockpot Kinda Day

It's a rainy day....   a day with appointments to keep
and time to save! A perfect day to try one tried and true
and a brand new (to me) recipe....Have you ever made
Crockpot Lasagna?
No, well me either until today.

Ingredient list:
Spagetti sauce  (I used one can Hunt's, one jar of
home made and 1 can of paste)
Sweet sausage & grond beef
Package of frozen cheese ravioli
Fresh baby spinach  (optional)
Shredded cheese 
Crock Pot
(size depending on quantity you want to make!)

Directions:
Cook the sweet sausage and ground beef then
add the sauce to make a nice thick spagetti sauce. 
(I also added about 2 TBsp of my frozen pesto for added flavor)
I sprayed the inside of the crockpot with an
olive oil spray to keep things from sticking...
this is totally optional.

Put a little bit of sauce on the bottom then start layering:
frozen ravioli  (enough to cover the sauce)
a little fresh spinach
a little shredded cheese
top with sauce
Repeat until you've used up your ingredients... top with cheese!
Turn the crock pot on low for 6-7 hours or on high for 4.
Serve hot with garlic bread... DELICIOUS!

Now for desert, how about a little  APPLE CRISP
with vanilla ice cream.... yummy!! 
 I can hardly wait to come home and smell this all cooking!

Peel and cut up 6-8 good sized apples 
(enough for 6-8 cups) put into a large bowl add
3/4 Cup brown sugar
1/2 Cup flour
2TBsp water
1 Cup oats
1 tsp. cinnamon
2 TBsp butter   (cut up)
Mix all of this together and put into a 4 quart crock pot
(Previously sprayed with olive oil so it won't stick).
Cook on low for a few hours!! 


Seriously, most crock pot recipes are very forgiving... 
 if you cook it a LITTLE bit longer or
shorter length of time it will be ok.
You can also USUALLY cook on high for
almost half of the time.